
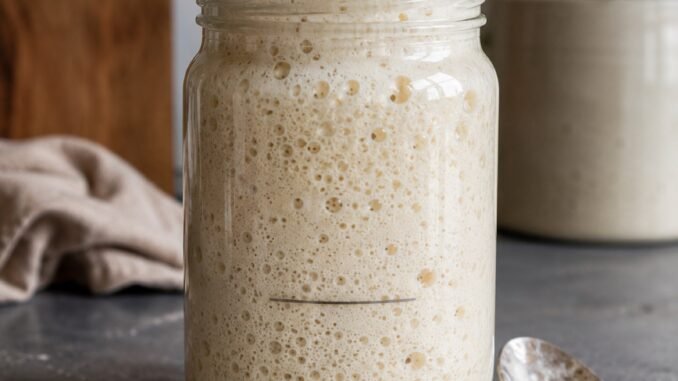
Making a sourdough starter feels like a science experiment you’re allowed to eat, and honestly, that’s half the fun. If you’re asking how can I make my own sourdough starter from scratch, here’s the reassuring truth: you need exactly two ingredients — flour and water — plus about a week of mild attention.
I’ve built starters from scratch three times now (two survived moves; one met a tragic end during a heat wave). The process is simple, but the internet makes it sound like rocket science. It’s not. Here’s the straightforward method that actually works.
How can I make my own sourdough starter from scratch: The Short Answer
Mix 50g whole wheat flour with 50g lukewarm water in a jar, cover loosely, and leave at room temperature. For 7–10 days, discard half daily and feed with 50g all-purpose flour and 50g water. Your starter is ready when it reliably doubles in size within 4–8 hours of feeding, smells pleasantly tangy, and passes the float test (a spoonful floats in water). Then bake with it weekly or store it in the fridge with weekly feedings.
Why This Matters More Than You Think
A sourdough starter is a colony of wild yeast and friendly bacteria living in symbiosis: the yeast produces carbon dioxide (rise) and the bacteria produce lactic and acetic acids (tang). King Arthur Baking’s sourdough guides The daily discard-and-feed routine isn’t wasteful fussiness — it keeps the colony fed and the acidity balanced so the good microbes outcompete the bad ones. Whole wheat or rye flour jumpstarts the process because it carries more wild yeast than white flour; you switch to all-purpose for feedings once things are bubbling.
5 Tips That Actually Work
Start with whole wheat or rye flour
White flour works eventually, but whole grain flour is alive with wild yeast and kickstarts fermentation days faster. Use 50/50 whole wheat and water for the first 3 days, then switch to all-purpose for regular feedings — it’s cheaper and your starter will be plenty strong.
Feed by weight, not volume
A 1:1:1 ratio by weight (starter:flour:water) is the gold standard. Cups are unreliable because flour compacts. A $14 kitchen scale makes this foolproof: keep 50g starter, add 50g flour, 50g water. Mark the jar with a rubber band so you can see the rise.
Keep it warm, not hot
Wild yeast loves 75–80°F. In a cold kitchen, park the jar in the oven with just the light on, or on top of the fridge. Below 70°F things slow to a crawl; above 85°F you risk favoring sour bacteria over yeast. Consistency matters more than exact temperature.
Watch for the signs, not the calendar
Days 2–3: exciting bubbles (often followed by a discouraging die-off around day 4 — totally normal). Days 5–7: steadier rising, tangy smell shifting from funky to pleasantly sour. Ready when: doubles in 4–8 hours, domed surface with bubbles, passes the float test. Some starters take 10–14 days; patience beats restarting.
Don’t pour discard down the drain
Starter discard turns to cement in pipes. Scrape it into the trash or — better — cook with it: discard makes incredible pancakes, crackers, pizza dough, and banana bread. There are entire recipe collections built around discard; it’s a feature, not waste.
My Favorite Tools and Brands
I only recommend gear I’ve actually used or that’s widely vetted by testing labs — FDA’s food safety guidance is worth checking before you buy.
- Wide-mouth quart mason jar — ~$10 — Easy to feed, stir, and observe; the rubber-band trick tracks rise.
- Kitchen scale — ~$14 — Weight-based feeding is the foundation of a healthy starter.
- Whole wheat flour (King Arthur) — ~$6 — For the initial inoculation; switch to AP after day 3.
- Danish dough whisk — ~$12 — Optional but wonderful for mixing thick starter without the mess.
Common Mistakes to Avoid
- Giving up on day 4. The mid-week slump — when early bubbles die off — is completely normal. The real colony is still establishing. Keep feeding.
- Using chlorinated water straight from the tap. Heavy chlorine can inhibit yeast. If your tap water smells strongly of chlorine, let it sit out overnight or use filtered water.
- Sealing the jar airtight. Fermentation produces gas; a sealed jar can build pressure or trap excess moisture. Cover loosely with a lid or cloth.
- Feeding irregularly once established. A neglected starter develops dark hooch (harmless alcohol — just stir it in) and turns sluggish. Weekly fridge feedings keep it happy indefinitely.
Frequently Asked Questions
How long does it take to make a starter from scratch?
Typically 7–14 days to a vigorous, bake-ready starter. Cooler kitchens run longer. Don’t rush it — a young starter makes dense bread; a mature one makes magic.
Can I use the discard?
Absolutely — that’s the best part. Sourdough discard makes fantastic pancakes, waffles, crackers, flatbreads, and chocolate cake. Search ‘sourdough discard recipes’ and you’ll never throw it away again.
How do I store my starter long-term?
In the fridge with a weekly feeding: take it out, discard half, feed, let it bubble an hour, back in the fridge. Going on vacation? A healthy starter survives 2–3 unfed weeks in the fridge. For months-long breaks, spread thin on parchment, dry completely, and store the flakes in a jar.
Baking With Your New Starter
Once your starter is doubling reliably, the simplest first bake is a no-knead sourdough: 500g bread flour, 375g water, 100g active starter, 10g salt. Mix, rest 30 minutes, do four sets of stretch-and-folds over two hours, then let it rise until puffy (4–6 hours), shape, and refrigerate overnight. Bake in a Dutch oven at 450°F — 20 minutes covered, 25 uncovered. It’s a forgiving recipe that teaches you to read dough, and the result will make you insufferably proud.
Flour, water, a week of feedings, and a little patience — that’s all a sourdough starter asks. Once it’s doubling reliably, you’re in the bread game for good. When you’re ready to bake, pair your new skills with when pasta is perfectly cooked al dente, and keep your kitchen momentum going with cook salmon so it stays juicy and breakfast recipes to feed a crowd.
Leave a Reply