
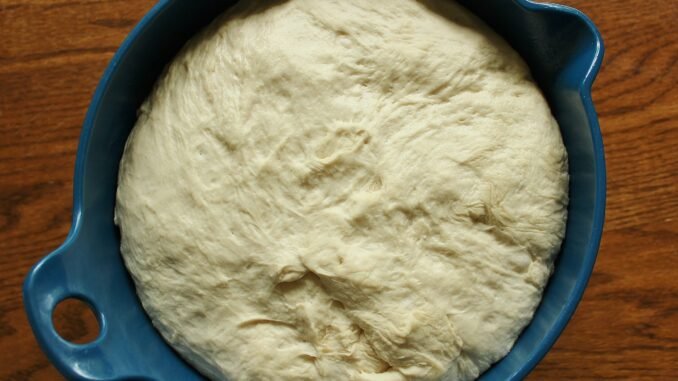
Under-proofed bread is dense and pale; over-proofed bread collapses into a sad, sour pancake. If you’re asking how do I know when my bread dough has risen enough, you’re asking the question that separates frustrating bread from fantastic bread — and the answer is in your fingertips, not the clock.
Recipe times (‘let rise 1 hour’) are suggestions at best, because your kitchen’s temperature changes everything. After many loaves, I’ve learned to read the dough itself. Here are the tests that never lie.
How do I know when my bread dough has risen enough: The Short Answer
Bread dough has risen enough when it passes the poke test: flour your finger, press 1/2 inch into the dough — if the indent springs back slowly and fills in partially, it’s ready; springs back fast means under-proofed, stays dented means over-proofed. Also look for: roughly doubled in size, a domed surface, visible air bubbles, and a light, airy feel. In a 75°F kitchen this takes 1–2 hours for the first rise; colder kitchens take longer.
Why This Matters More Than You Think
Rising (fermentation) is yeast converting sugars into carbon dioxide and flavor compounds. King Arthur Baking’s bread proofing guides Under-proofed dough hasn’t produced enough gas — the crumb will be tight and dense. Over-proofed dough has exhausted its gluten structure — the gas escapes, the loaf collapses, and the flavor turns harshly sour. The poke test works because it directly measures gluten elasticity: perfectly proofed dough has stretched gluten that rebounds slowly, like a well-rested muscle.
6 Tips That Actually Work
Master the poke test
This is the single most reliable doneness test in bread baking. Lightly flour your fingertip and press about half an inch into the dough. Springs back immediately: needs more time. Springs back slowly, leaving a slight indent: perfect — shape it now. Stays dented with no spring: over-proofed (bake it anyway as focaccia — still delicious). Practice this every bake and it’ll become second nature.
Learn the visual and touch cues
Properly risen dough has roughly doubled (use a straight-sided container with a rubber-band marker to judge honestly), looks domed and slightly puffy, shows bubbles just under the surface, and feels light and airy — almost pillowy. It should jiggle slightly when you nudge the bowl. Dense, heavy-feeling dough needs more time no matter what the clock says.
Control your temperature
Yeast’s happy zone is 75–80°F. Cold kitchen? Proof in the oven with just the light on (reaches ~80°F), or in the microwave next to a cup of boiling water. Too warm (above 90°F) and fermentation races — flavor suffers and over-proofing sneaks up. A $10 instant-read thermometer can check your proofing spot.
Use the aliquot jar trick
Pinch off a small piece of dough after kneading and stuff it into a small straight-sided jar or shot glass. Mark the level. When the sample has risen 50–75%, your main dough is ready — it’s a perfect miniature gauge that removes all guesswork, especially useful in cold kitchens.
Know the second rise is shorter
After shaping, the final proof typically takes 30–60 minutes — roughly half the first rise. The poke test applies here too, and it’s even more critical: most home bakers over-proof the final rise. When in doubt, bake slightly under-proofed rather than over — oven spring will compensate.
Rescue over-proofed dough
Don’t throw it out! Gently deflate, reshape, and give it a shorter second rise — or pivot: flatten into focaccia, dimple with your fingers, drizzle olive oil, and bake. Some of my best ‘failures’ became dinner’s favorite bread.
My Favorite Tools and Brands
I only recommend gear I’ve actually used or that’s widely vetted by testing labs — Serious Eats’ bread science is worth checking before you buy.
- Straight-sided proofing container — ~$15 — Seeing the actual rise level beats guessing in a sloped bowl.
- Instant-read thermometer — ~$17 — Check dough temp (75–78°F ideal) and your proofing spot.
- Bench scraper — ~$10 — For handling risen dough without deflating it.
- Banneton proofing basket — ~$20 — Supports the final rise and gives artisan-style rings.
Common Mistakes to Avoid
- Trusting the clock over the dough. An hour at 68°F and an hour at 80°F are completely different rises. The poke test doesn’t care about your kitchen temp.
- Poking without flour. A sticky finger tears the surface and gives a false reading. Flour it first, press gently.
- Letting shaped loaves over-proof. The final rise is where most loaves die. Set a timer for 30 minutes and start checking early.
- Proofing somewhere too warm. On top of a hot oven or in direct sun can push dough past 90°F — fast, sour, collapsed bread. Warm, not hot.
Frequently Asked Questions
How long should bread dough rise?
Typically 1–2 hours for the first rise at 75°F, 30–60 minutes for the second. But temperature, yeast amount, and dough hydration all shift this — which is exactly why the poke test beats the clock every time.
Can I let bread rise overnight?
Yes — cold fermentation in the fridge (8–12 hours) actually improves flavor dramatically as the yeast works slowly and bacteria develop complexity. Shape cold dough straight from the fridge and bake; just add 10–15 minutes to the bake.
What happens if I bake under-proofed bread?
You’ll get a dense crumb with poor volume, but it’s still edible — and oven spring (the initial burst of rise in the hot oven) partially compensates. Under-proofed beats over-proofed almost every time.
Reading Dough in Winter
Cold kitchens are the number-one reason beginners think their bread ‘isn’t working.’ If your kitchen sits at 65°F, everything takes roughly twice as long as the recipe says — and that’s fine, as long as you know. My winter proofing spot is the oven with the light on and a pan of hot water on the lower rack, which holds a steady 78°F. In summer I proof on the counter and check earlier. The dough doesn’t care about the recipe’s clock; it cares about temperature and time, and now you know how to read both.
Forget the timer — the poke test, the doubled volume, and the pillowy feel tell you when dough is ready. Slightly under-proofed always beats over-proofed. Once your bread game is strong, keep the baking momentum with grill vegetables so they don’t fall through the grates, easy dinner recipe for busy weeknights, and store leftovers safely.
Leave a Reply