
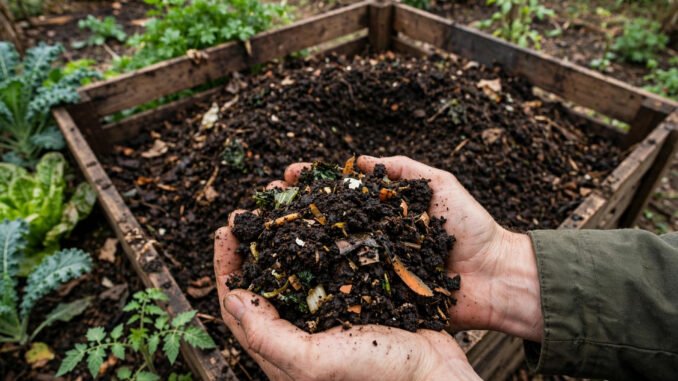
Every kitchen produces the same choice each day. Peelings, coffee grounds, and stale bread can go out with the trash and rot in a landfill, or they can become the richest soil booster a home gardener will ever get for free. The gap between those two outcomes is not talent or costly gear. It is a container, a simple ratio, and picking the method that suits the home you live in.
How a Pile Actually Eats
Composting is farming at the smallest scale. You are feeding microbes, and the microbes do the work. Given food, air, and moisture, bacteria and fungi break scraps down bit by bit, and the pile changes in stages as different microbes take their turn. A plain account of compost and how it forms shows the same pattern in a garden heap or a forest floor: living things eating, heating, and leaving humus behind.
The first stage belongs to moderate-temperature microbes. They start on the easy sugars and soft scraps, and their work warms the pile. Once the center climbs above roughly 105 degrees Fahrenheit, heat-loving microbes take over. A healthy active pile runs about 130 to 160 degrees Fahrenheit at its core. That heat matters for safety, since it is hot enough to kill most weed seeds and pathogens hiding in the mix.
Heat does not last, and it should not. As the easy food runs out, the pile cools. Then comes curing, the slow finish that many beginners rush. During curing the material turns dark, crumbly, and earthy smelling, with few scraps still recognizable. Finished compost looks and smells like rich soil because, in every way that matters to a plant, that is what it has become.
The scale of what households throw away gives the habit weight. The US generates tens of millions of tons of wasted food a year. The EPA put it at about 66 million tons in its 2019 estimate. No single kitchen fixes a figure like that. Still, every bucket of scraps a household composts is food that feeds soil instead of sitting in a landfill, and the habit spreads one street at a time.
The Recipe Every Method Shares
All three methods below run on the same four parts. Greens supply nitrogen: fruit and vegetable scraps, coffee grounds, and fresh grass clippings. Browns supply carbon: dry leaves, shredded cardboard, and straw. Standard composting guidance puts the mix at roughly 3 parts browns to 1 part greens by volume. When in doubt, add browns. Too many greens cause nearly every beginner problem, from slime to stink.
Air is the third part. A pile with no air turns sour and slow, because the useful microbes need oxygen. Turn a heap every one to two weeks with a fork, or spin a tumbler and let the drum do the turning. Water is the fourth part. Aim for the feel of a wrung-out sponge: damp all through, never dripping, never dusty. A dry pile sleeps. A soaked pile drowns.
Kitchen rhythm helps more than people expect. A household that cooks in batches produces a steady, sortable stream of scraps instead of a daily scramble. Anyone planning a simple weekly meal prep routine will notice the pattern fast: one prep session fills the counter caddy once, browns go on top, and the pile gets fed in calm layers rather than random dumps.
Know what stays out of a standard pile, and hold the line. Keep out meat, dairy, and oils, which draw pests and smell as they rot. Keep out pet waste from meat-eating animals, which can carry pathogens. Keep out diseased plants, glossy paper, and anything synthetic. Weeds that have gone to seed belong elsewhere too, unless your pile reliably runs hot enough to kill the seeds. Fruit and vegetable scraps, eggshells, coffee grounds and filters, and plain bread or grains in small amounts are all welcome.
Method One: The Backyard Bin or Pile
The classic heap is the cheapest route and the best fit for a house with a garden. A bin built from pallets can cost nothing. A tumbler, which makes turning easy, runs roughly $80 to $150 at recent prices. The pile asks for outdoor space and a little patience, and in return it handles serious volume: autumn leaves, garden trimmings, and a full household’s scraps all at once.
Timing is honest rather than fast. Expect harvest in about 2 to 6 months, with the short end coming from hot, well-turned piles in warm weather and the long end from quiet heaps left mostly alone. Nothing about that range is a promise. Climate, pile size, and how often you turn all move it. What the pile does guarantee is capacity. For a family that gardens, no indoor system keeps up.
The weakness is access and effort. A heap at the far end of a wet garden in January tests good intentions. A tumbler near the back door fixes much of that, which is why it suits a beginner who wants the least fuss. Start the pile where you will actually walk to it in bad weather, and the habit has a far better chance of surviving its first winter.
Method Two: Vermicomposting Indoors
Worms change the setting entirely. A worm bin lives indoors, in a closet, a laundry room, or under a sink, and quietly turns scraps into rich castings that gardeners prize. Run well, it is nearly odorless. There is no turning, no heat to chase, and no yard required, which makes it the clear apartment answer among the three methods.
The practice of vermicomposting with worms rests on a simple trade. You give red wigglers bedding, moisture, and a steady diet of scraps, and they process the scraps day and night. Their limits are real, though. Throughput is smaller than a backyard pile, so a big cooking household may outpace one bin. Worms also dislike overloads of citrus and onion, and meat and dairy stay out of a worm bin entirely.
Care is light but steady. Feed in one corner at a time, keep bedding damp, and watch for fruit flies, which usually mean scraps were left exposed on the surface. Burying each feeding under bedding solves that in most bins. Harvesting castings takes a slow afternoon a few times a year. For a small household that cooks often, the castings alone can justify the bin: a small amount worked into potting mix goes a long way.
Method Three: Bokashi Fermentation
Bokashi is the odd one out, and honesty matters here. It ferments rather than composts. Scraps go into a sealed bucket in layers with a treated bran, the lid keeps air out, and helpful microbes pickle the contents over about two weeks. Even cooked food and small amounts of meat or dairy can go in, which no standard pile should accept.
The speed of the kitchen-side step is the draw. The bucket fills, ferments, and empties on a tidy cycle, with a liquid that can be diluted and used as a plant feed. The limit comes after the bucket. Fermented contents are not finished compost. They need to finish breaking down in soil, buried in a garden bed or added to a compost bin, and that takes a further stretch of time out of sight.
So bokashi suits a home with no yard of its own but access to soil somewhere: a community garden bed, a large planter, a friend’s heap. It also suits cooks who hate the idea of sorting cooked scraps out of the bin. The ongoing cost is the bran, which must be bought or made. Weigh that small repeat cost against the freedom of one bucket for nearly everything the kitchen produces.
Picking Your Method and Fixing Problems
Match the method to the home, not to ambition. A house with a garden points to the pile or the tumbler, which swallow volume and ask little money. An apartment points to worms for steady soil output, or bokashi where there is soil access for the finish. A beginner who wants the least fuss of all should start with the tumbler. Each route beats the perfect system that never gets started.
Problems, when they come, speak plainly. A bad smell means too many greens or a pile that is too wet: add a thick layer of browns and turn it. Flies mean scraps are exposed: bury them under browns every time you add them. A pile where nothing happens is usually too dry, too small to hold heat, or starved of greens. Add water, mass, or scraps to match the cause, then wait a week before judging.
Finished compost earns its place quietly. Spread it as a mulch around plants, blend it into potting mix, or work a layer into a tired bed before planting. A little goes a long way, and no honest guide should claim it replaces all fertilizer for hungry crops. Think of it as the base that makes soil alive and forgiving. Start with one bucket of scraps this week, keep the browns close, and let the microbes handle the rest.
Leave a Reply