
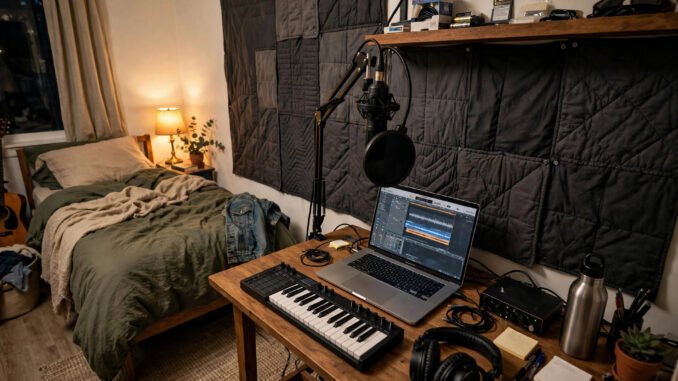
A working home studio once meant a dedicated room, a large console, and a bill that ran to tens of thousands. That world has gone. The same core jobs, capturing a clean performance and hearing it back honestly, now fit on a desk for under $500. The catch is order. Beginners who buy in the wrong sequence end up with a pricey microphone listening to a bad room through headphones that flatter everything. Buy in the priority order below and each dollar lands where recordings actually improve.
The Priority Checklist, in Buying Order
Six boxes, in the sequence that matters. Work down the list and do not skip ahead just because a later box looks more exciting in a product photo.
Box one: the room. Budget $0 to $100. Blankets, placement, and a few proper panels before any other purchase.
Box two: listening. Budget $80 to $150. One honest pair of headphones first, speakers much later.
Box three: the microphone. Budget $70 to $150. One good microphone matched to your room and your main job.
Box four: the interface. Budget $0 to about $120 at the entry end. Zero if your microphone is USB, real money only when you move to XLR.
Box five: the recording software. Budget $0 to $60. Free programs are capable, and one respected paid option costs a single $60.
Box six: accessories. Budget $50 to $100. The stand, filter, and cables that let the rest of the kit do its job.
Picked sensibly inside those bands, a complete setup stays under $500. The three worked budgets near the end show the arithmetic with real line items, so you can check every total yourself.
Priority One: The Room Comes First
Every recording contains two things: the source you wanted and the room it happened in. Sound leaves your mouth or instrument, hits the walls, ceiling, and floor, and bounces back into the microphone a fraction of a second later. Those first bounces, called first reflections, smear clarity more than any other beginner problem. A short primer on room acoustics and first reflections shows why the wall beside you matters as much as the wall in front of you.
Find the first reflection points by sitting in your recording spot and imagining a mirror on each side wall where you would see the source reflected. Those spots, plus the wall behind you and the ceiling above the spot, are where treatment earns its keep. Heavy blankets hung with a small air gap behind them calm those reflections for almost nothing. Proper DIY panels filled with dense rockwool do the job better and look tidier for modest money. Thin decorative foam sits at the bottom of this ranking. It absorbs a little high-frequency flutter and leaves the thicker problems untouched.
The cheapest vocal booth in the world is already in many homes. A clothes-filled closet gives you soft, uneven absorption on nearly every side, and singers have used that trick for decades because it works. Record a test line in the closet, the bedroom centre, and the bathroom, then compare on headphones. The lesson lands faster through your ears than through any explanation.
One honesty note belongs here and should never be softened. Treatment tames reflections inside the room. It does not soundproof. Your neighbours will still hear a loud singer, and street noise will still enter a quiet take. Work at sensible hours, communicate like a decent neighbour, and choose quieter times for delicate recordings.
Priority Two: Honest Listening
You cannot fix what you cannot hear, and you cannot hear accurately through speakers in an untreated room or through headphones designed to make music sound exciting. Listening comes second only to the room itself.
Start with headphones. The Audio-Technica ATH-M40x and the Sony MDR-7506 both sit around $80 to $100 and both aim for a flat, plain presentation. Bass is present without swelling, highs are clear without sparkle added for effect. Mixes and recordings judged on a pair like this tend to survive the trip to a car, a phone, and a friend’s speaker, which is the entire point.
Small studio monitors are the later purchase, not the starter one. A decent pair runs around $200 to $300, and in a bare room they mostly give you a clearer picture of your room’s problems. Add basic treatment first, learn your headphones deeply, and let monitors arrive when a real limitation, such as mixing for a room full of listeners or checking how a song feels in open air, actually appears.
Priority Three: One Good Microphone
With the room calmed and honest listening in place, a microphone finally gets to show what it can do. One good model covers most beginner needs. A second microphone bought early usually records the same problems from a slightly different angle.
Match the family to the space. The Samson Q2U, around $70, is a dynamic microphone that forgives untreated rooms, focuses on a close voice, and connects by USB or XLR, so it grows with the rest of the setup. For spoken voice, streaming, and loud sources in ordinary rooms, that forgiveness is worth more than detail. The Audio-Technica AT2020, around $99, is a condenser that rewards a treated space with clear, detailed capture of vocals and acoustic instruments. Buy the detail only when your corner can support it.
Placement multiplies either choice. Close for voice, slightly off to the side to dodge breath blasts, and gain set so peaks stay comfortably below distortion. A well-placed $70 microphone in a calmed room will embarrass a careless setup costing several times more, and your own test recordings will prove it within an afternoon.
Priority Four: The Interface, Only When Needed
An interface converts an XLR microphone’s signal for your computer and provides clean gain, headphone monitoring, and inputs that can grow. USB microphones skip this box entirely, which is their main charm. If your chosen microphone is USB, your interface budget is honestly $0, and that money belongs elsewhere on this list.
When you do move to XLR, shop in the established entry class. The Focusrite Scarlett Solo range is the common example, roughly $120 to $180 depending on generation and current sales. Clean preamps, dependable drivers, and a headphone output you can trust matter more than bundled extras. Buy the number of inputs your real recording life needs. Most solo beginners need one or two, not eight.
Priority Five: The Software and the Computer It Runs On
Recording software, the DAW, is where tracks are captured, edited, arranged, and mixed. The good news for a tight budget is that capability here is nearly free. GarageBand costs nothing on a Mac. Other free options cover Windows and Linux well. Reaper asks $60 for its discounted licence after a full trial period and serves many producers for years. Before spending on software extras, spend time learning the program you picked; depth in one tool beats a shallow tour of four.
One name needs current facts attached to it. The old free Cakewalk by BandLab program was retired in 2025, so do not build a new setup around it as if it were a living product. Its successor line, Cakewalk Sonar, offers a free tier, and that is the current route for anyone drawn to that family. Retired software means stranded habits, so start on something maintained.
The computer running all of this does not need to be new. Production loads are modest beside gaming or video work, and a solid second-hand laptop often beats a flashy new machine bought at the cost of the whole audio budget. If that route tempts you, work through what to check when buying a used laptop before money changes hands: battery health, ports, storage space, and a clean install matter more than a shiny lid. Whatever machine you use, a structured overview of what a digital audio workstation does will help you judge whether a given laptop and program pairing fits the work you plan.
Priority Six: Accessories That Earn Their Shelf Space
Accessories look dull and prevent daily friction. A stand or boom arm holds the microphone at the same height and distance every session, which keeps recordings consistent. A pop filter, a cheap mesh or foam screen between mouth and microphone, tames the puffs of air on hard consonants that ruin otherwise good takes. Cables deserve a modest spend too: one or two decent leads that do not crackle when they move.
Add a comfortable chair if you edit for long stretches, and keep a small notebook or notes app habit for settings that worked. None of this is glamorous. All of it removes the small annoyances that quietly stop beginners from pressing record.
Three Complete Budgets, With the Sums Shown
Each budget below lists its line items first and its total as the sum of those items, so the arithmetic is open to check.
The voice starter totals $250. Room blankets and simple panels $30, plus headphones $90, plus a Samson Q2U microphone $70, plus an interface $0 because that microphone runs on USB, plus recording software $0 using a free program, plus a stand, pop filter, and cable set $60. Added together: $30 + $90 + $70 + $0 + $0 + $60 = $250.
The treated-corner music setup totals $500. Room panels and heavy blankets $75, plus headphones $95, plus an Audio-Technica AT2020 microphone $99, plus an entry XLR interface $150, plus recording software $0 using a free program, plus stand, filter, and cables $81. Added together: $75 + $95 + $99 + $150 + $0 + $81 = $500.
The Reaper upgrade path totals $320. Room treatment $50, plus headphones $85, plus a Samson Q2U microphone $70, plus an interface $0 on USB, plus a Reaper licence $60, plus accessories $55. Added together: $50 + $85 + $70 + $0 + $60 + $55 = $320.
What Not to Buy Yet
Skip the second microphone until the room is treated and the first microphone is fully learned. Skip expensive plugin bundles while the free tools inside your software remain unexplored; most beginner limits live in placement and balance, not in software. Skip the small foam vocal booth box sold as a miracle. A closet or a blanket arrangement usually beats it for less. Skip monitors in an untreated room, for the reasons covered under listening. Each skipped purchase protects the order that makes the whole setup work: room first, ears second, microphone third, and everything else in its turn.
Leave a Reply