
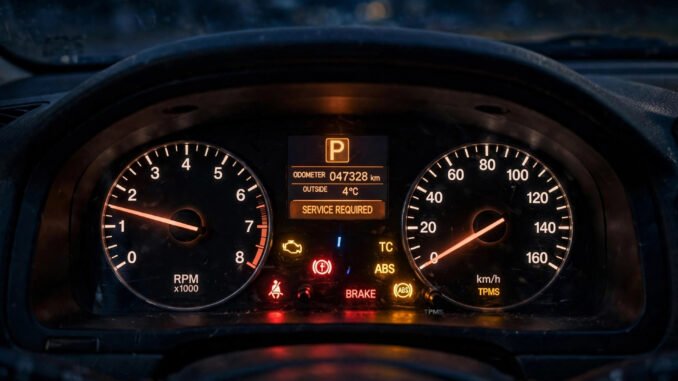
A strange light just appeared on your dashboard — is it a friendly reminder or a $2,000 emergency? For beginners, dashboard warning lights are a source of genuine anxiety: there are dozens of them, some look alarming, and ignoring the wrong one can destroy an engine. Learning what they mean does not take long — about 30 minutes to learn the critical ones — but the payoff timeline is immediate: the next light that appears, you will know exactly what to do instead of panicking.
This guide covers the warning lights that matter, the color code that tells you how urgently to act, and the decision framework for every light you will ever see.
The Color Code: Your First Decision Tool
Before learning individual symbols, learn the colors — they tell you 80% of what you need:
RED = stop safely, now. Red lights indicate serious problems requiring immediate attention: oil pressure loss, overheating, brake system failure. Pull over safely as soon as possible and turn off the engine. Driving with a red warning light risks catastrophic damage.
YELLOW/AMBER = caution, check soon. Something needs attention but is not immediately dangerous: check engine, low tire pressure, ABS fault, stability control. You can usually drive to a mechanic or finish your trip, but schedule diagnosis promptly — days, not months.
GREEN/BLUE = information. Headlights on, cruise control active, turn signals — these are status indicators, not warnings. No action needed.
This single framework handles most situations: red means stop, yellow means schedule, green means ignore. Everything below is detail on the important ones.
The Critical Lights (Learn These First)
Oil pressure warning (red — oil can icon)
The most urgent light on your dashboard. It means oil is not circulating properly — without oil pressure, engine bearings destroy themselves in minutes. Action: pull over immediately, turn off the engine, call for help. Do not “drive to the next exit” — minutes matter. Check oil level once stopped (you may just be low), but do not restart if the light persists. This light has killed more engines through delayed response than any mechanical defect.
Coolant temperature (red — thermometer in waves)
Engine overheating. Action: pull over, turn off the engine, wait 30+ minutes before opening anything (pressurized hot coolant causes severe burns). Common causes: coolant leak, failed thermostat, broken water pump. Driving an overheating engine warps cylinder heads — turning a $300 repair into a $3,000 one. Never remove a hot radiator cap.
Brake system warning (red — exclamation in circle, or “BRAKE”)
Brake fluid low, brake system fault, or parking brake engaged. Action: check the parking brake first (embarrassing but common). If the light stays on, brake performance may be compromised — drive cautiously to the nearest mechanic or call for a tow. Brakes are the one system where caution is never excessive.
Check engine (yellow — engine outline)
The most common and most misunderstood light. It means the onboard computer detected an emissions or engine-management fault — ranging from a loose gas cap (free fix, extremely common) to serious issues. Action: if it is steady, schedule diagnosis within days. If it is flashing, that indicates an active misfire that can damage the catalytic converter — treat it as urgent and reduce speed/load immediately. A $20 OBD-II Bluetooth scanner plus a free phone app reads the fault code yourself — the code (e.g., P0301) tells you exactly what the car detected. Auto parts stores read codes free as well.
Tire pressure (yellow — horseshoe with exclamation)
TPMS light: one or more tires is significantly underinflated. Action: check pressures at the next gas station (the correct pressures are on the driver’s door jamb sticker, not the tire sidewall). Underinflation wastes fuel, wears tires unevenly, and in extreme cases risks blowouts. If the light flashes then stays solid, the TPMS sensor itself may have failed.
Battery/charging (red — battery icon)
The charging system is not charging — usually a failing alternator or broken belt. Action: turn off non-essential electrics (A/C, heated seats, stereo) and drive to the nearest mechanic immediately. You are running on battery alone, which lasts 20–60 minutes. This light often precedes a dead car — which is when your family emergency plan earns its keep.
The Secondary Lights (Good to Know)
ABS (yellow): anti-lock brake fault — normal brakes still work, but ABS will not engage in hard stops. Drive carefully in slippery conditions; schedule repair.
Traction/stability control (yellow, flashing during slips is normal): solid light means the system is off or faulted. Fine in dry conditions; be cautious in rain/snow.
Airbag/SRS (red/yellow): airbag system fault — airbags may not deploy in a crash. Schedule promptly; this is a safety system.
Low fuel, washer fluid, service reminders: self-explanatory maintenance items. The service reminder (wrench icon) is just a mileage-based prompt, not a fault.
The Decision Framework (For Any Light)
When any unfamiliar light appears: 1) note the color (red/yellow/green), 2) check if the car feels different (noises, smells, handling changes, power loss — any of these escalate urgency regardless of color), 3) consult the owner’s manual (the symbols section — every car’s manual has it, and it takes 60 seconds), 4) act on the color code. Red + symptoms = stop now. Yellow + normal feel = schedule soon. When in doubt between levels, choose the more cautious action — the cost of unnecessary caution is a tow bill; the cost of insufficient caution is an engine.
Modern cars also display text explanations in the instrument cluster menu — scroll through it before panicking. And diagnosing phone problems uses the same mindset: observe symptoms, check the obvious, escalate methodically. For model-specific light meanings, the NHTSA and AAA’s dashboard warning light guide are authoritative references.
Conclusion
Understanding dashboard warning lights takes 30 minutes to learn and pays off the very next time one appears: red means stop safely now, yellow means schedule diagnosis soon (flashing check-engine is urgent), green means information only. Learn the six critical lights cold, keep a $20 code reader in the glove box, and never ignore a red light to “see if it goes away.” The dashboard is your car talking to you — now you speak the language.
Frequently Asked Questions
Can I drive with the check engine light on?
If it is steady and the car feels normal: yes, to a mechanic within days. If it is flashing: minimize driving immediately — flashing indicates active misfire that damages the catalytic converter ($1,000+ part). Get the code read free at any auto parts store.
Why did all my dashboard lights come on at once?
Usually a weak battery or failing alternator — low voltage makes every system report faults simultaneously. If the car starts and runs, drive to have the charging system tested. If multiple red lights appear while driving, pull over safely.
Will the warning light reset itself?
Sometimes — intermittent faults (like a loose gas cap) clear after several drive cycles once resolved. But the fault code stays stored, and persistent lights indicate ongoing issues. Do not assume a light that went off means the problem is gone; get the code read.
How much does check engine light diagnosis cost?
Code reading is free at most auto parts stores. Professional diagnosis runs $100–$150 at independent shops. The repair cost depends entirely on the code — from a $0 gas-cap tightening to $1,000+ for catalytic converters. The code tells you which.
Should I buy an OBD-II scanner?
Yes — a $20 Bluetooth scanner plus a free app pays for itself the first time a check engine light appears. It tells you the fault code instantly, letting you distinguish “loose gas cap, ignore” from “misfire, act now” without a shop visit.
Leave a Reply